 👀 Choose SSD-powered VPS servers for increased speed, power, and security! Now 50% off- starting from only $3.19/mo.
This article provides a guide for how to install WireGuard VPN on CentOS VPS server.
What is WireGuard VPN?
WireGuard VPN is a lightweight and powerful control panel for the modern web.
Features of WireGuard VPN:
- Quick and easy setup
- Slim code base
- modern cryptographic techniques
- Supports many operating systems
- Fast connection setup
- Very high speed
- Open Source
How to Install WireGuard VPN on CentOS VPS Server
- Login to VPS as root user using SSH.
- Update server packages:
sudo yum update -y
- Run the following command as root user:
curl -O https://raw.githubusercontent.com/angristan/wireguard-install/master/wireguard-install.sh
chmod +x wireguard-install.sh
./wireguard-install.sh
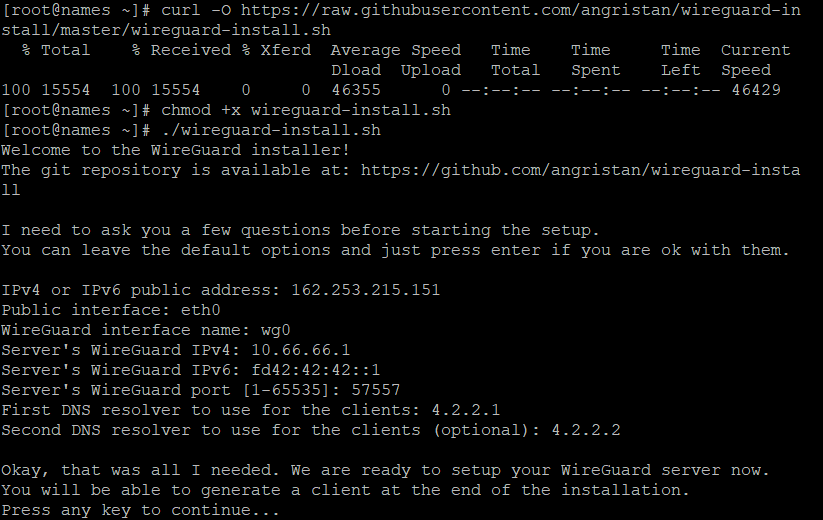
- Provide response to questions in WireGuard installer. Example:
Welcome to the WireGuard installer!
The git repository is available at: https://github.com/angristan/wireguard-install

I need to ask you a few questions before starting the setup.
You can leave the default options and just press enter if you are ok with them.

IPv4 or IPv6 public address: 162.253.215.151
Public interface: eth0
WireGuard interface name: wg0
Server's WireGuard IPv4: 10.66.66.1
Server's WireGuard IPv6: fd42:42:42::1
Server's WireGuard port [1-65535]: 57557
First DNS resolver to use for the clients: 4.2.2.1
Second DNS resolver to use for the clients (optional): 4.2.2.2

Okay, that was all I needed. We are ready to setup your WireGuard server now.
You will be able to generate a client at the end of the installation.
Press any key to continue...
- Press any key to initiate package installation and configuration script.
- Once packages are installed, setup client user (used for client connections):
Tell me a name for the client.
The name must consist of alphanumeric character. It may also include an underscore or a dash and can't exceed 15 chars.
Client name: wgadmin
Client's WireGuard IPv4: 10.66.66.2
Client's WireGuard IPv6: fd42:42:42::2

Here is your client config file as a QR Code:

It is also available in /root/wg0-client-wgadmin.conf
If you want to add more clients, you simply need to run this script another time!
- You can now configure WireGuard VPN clients with client user configuration (scan QR code or import the wg0-client-wgadmin.conf file).


Conclusion
You now know how to install WireGuard VPN on CentOS VPS server.
