 👀 Choose SSD-powered VPS servers for increased speed, power, and security! Now 50% off- starting from only $3.19/mo.
This article provides a guide for how to clone a website in cPanel. This guide is intended for users of cPanel Hosting and WHM Reseller Hosting services.
A cloned website is a perfect duplicate of a site hosted on your server. It has the same files, and the contents of its database are identical to the original. The only difference is that the cloned site is hosted at another domain or directory.
There are many reasons you might want to clone websites on your cPanel server. Because the copies are identical to an existing website, cloning helps deploy testing and staging sites. It's also a quick way to set up a new site using the old one as a baseline configuration. Site owners often use cloned sites to give designers and developers access to a working environment that behaves like the live environment.
Cloning can be done on the command line, but it's time-consuming, and it's easy to make a mistake. cPanel & WHM automates the more error-prone steps, so you can quickly clone sites based on content management systems and eCommerce applications.

How to Clone a Website in cPanel
Content management systems—including WordPress, Joomla, and Drupal—are composed of two main asset types. The first is PHP code files and static files such as images, JavaScript files, and CSS. The second is information stored in the site's database—page content, configuration settings, user information, and so on.
To clone a site, we have to copy both, so the process looks like this:
- Create a new folder and copy the site's files into it.
- Export the original site's database, create a new database for the clone, and import the data into it.
- Configure the clone to work with the new database.
Let's see how we'd use this process to clone a WordPress site. We're going to focus on cloning a site into a new directory rather than a subdomain.
Create a Folder and Copy the Site's Files
We can create a folder for the site's clone and copy the files in File Manager, which you can open from the Files section of cPanel's main page menu.
- Select the directory containing the WordPress site you want to clone.
- Click Copy in the toolbar and enter a name for the new directory. To keep things simple, we'll clone the site into a directory under public_html so that you can access it from a URL such as "example.com/wordpress_two."
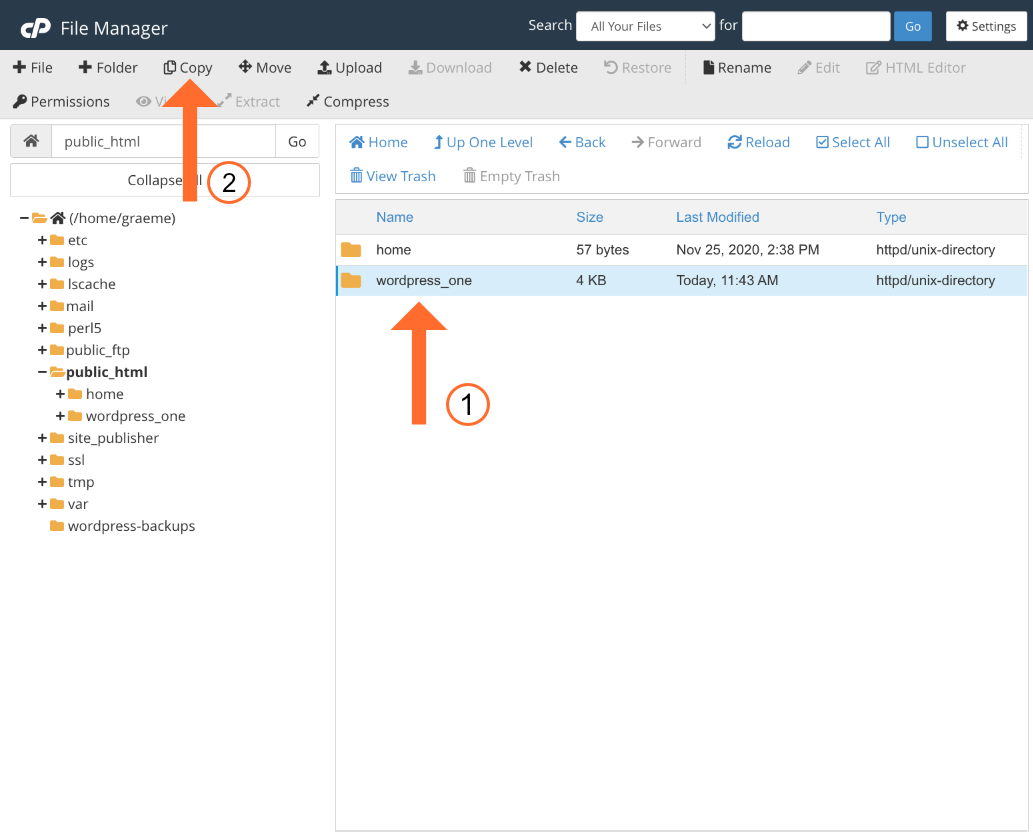
File Manager copies the directory and all of its contents, giving you an exact duplicate of the original site's files.
Clone the Site's Database
Cloning the database is a little more complicated than copying files, but it's straightforward with cPanel's MySQL tools.
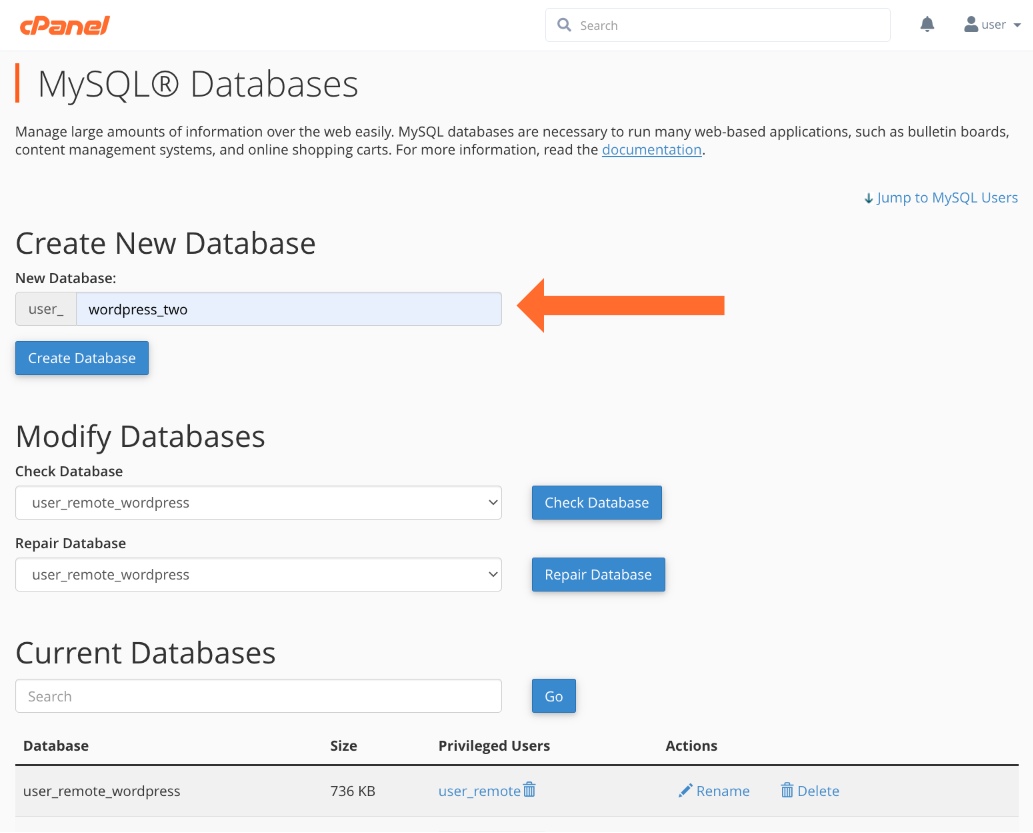
First, we create a new database.
- Open MySQL Databases, which you'll find under Databases the main page menu.
- Enter a name for the new database under Create New Database and click the Create Database button.
Next, we export the original database. We'll use phpMyAdmin, which is also under Databases in the cPanel menu.
- Select the original database in the sidebar.
- Select the Export tab and make sure the Quick export method is selected. The custom method lets you change database export options, but we'll stick with the defaults.
- Click Go.
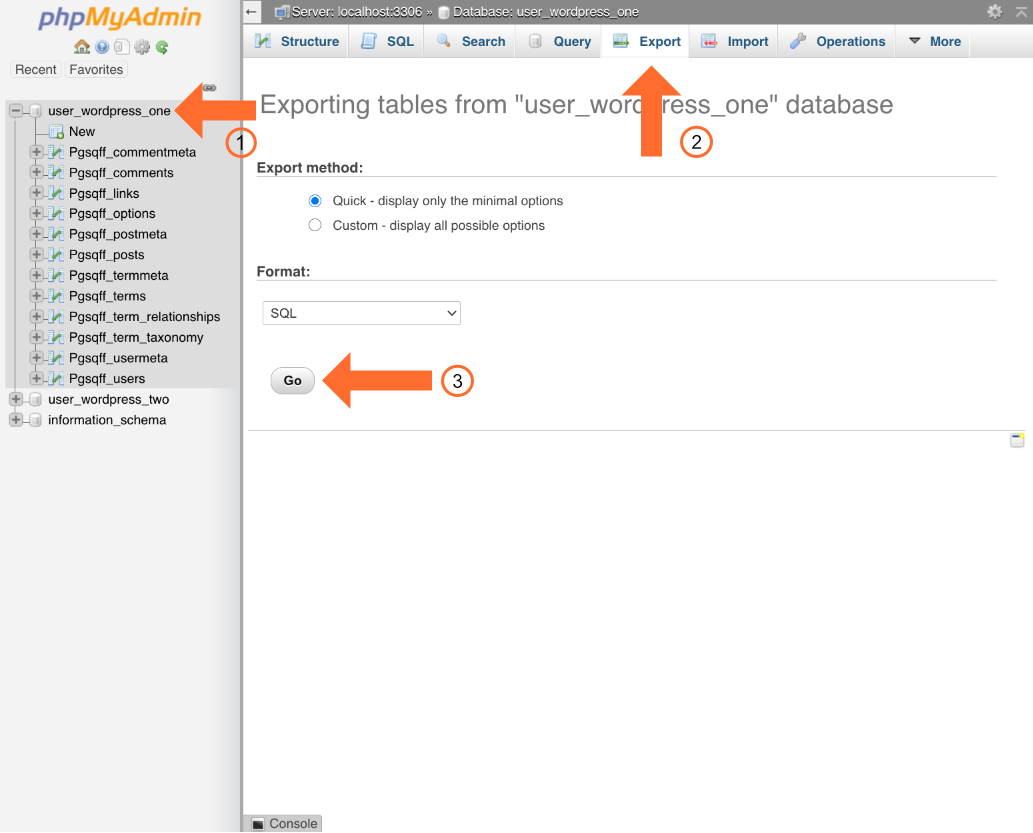
This "dumps" the database, downloading an SQL file to your local machine with the information needed to recreate the original site's database. That's what we're going to do next, also using phpMyAdmin.
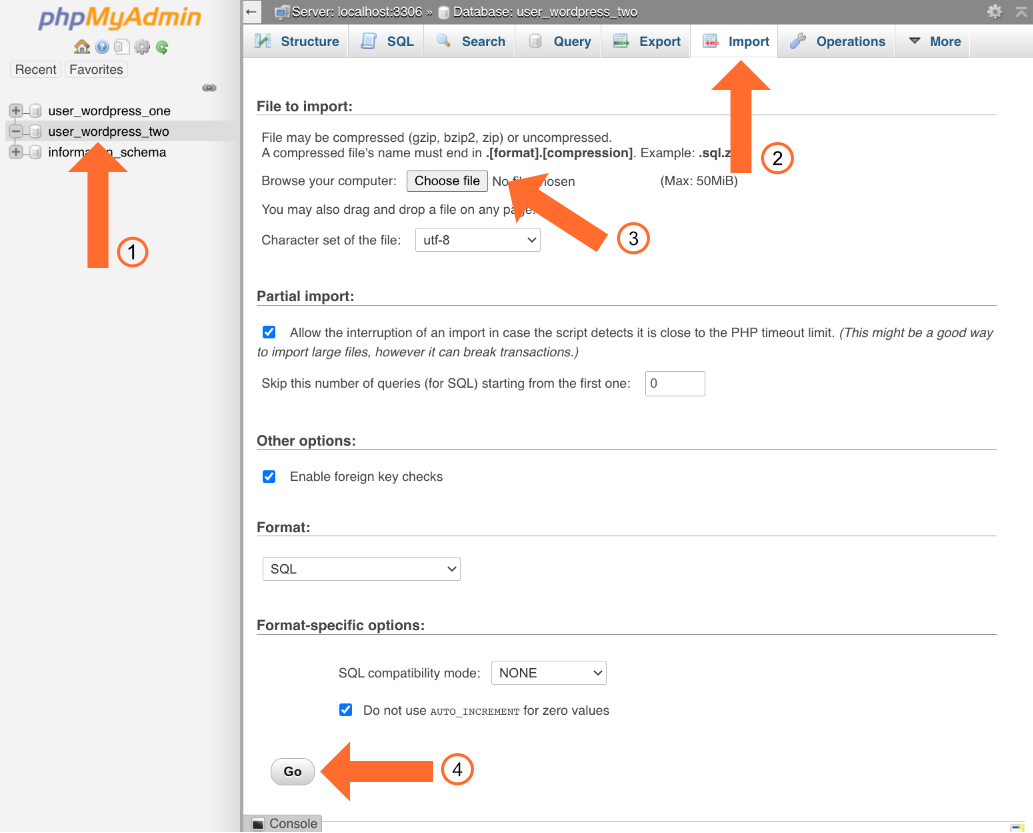
- Select the new database (the one we created in the previous section).
- Click the Import tab.
- In the File to import section, click Choose File and browse to the SQL file you just downloaded.
- Click the Go button at the bottom of the page.
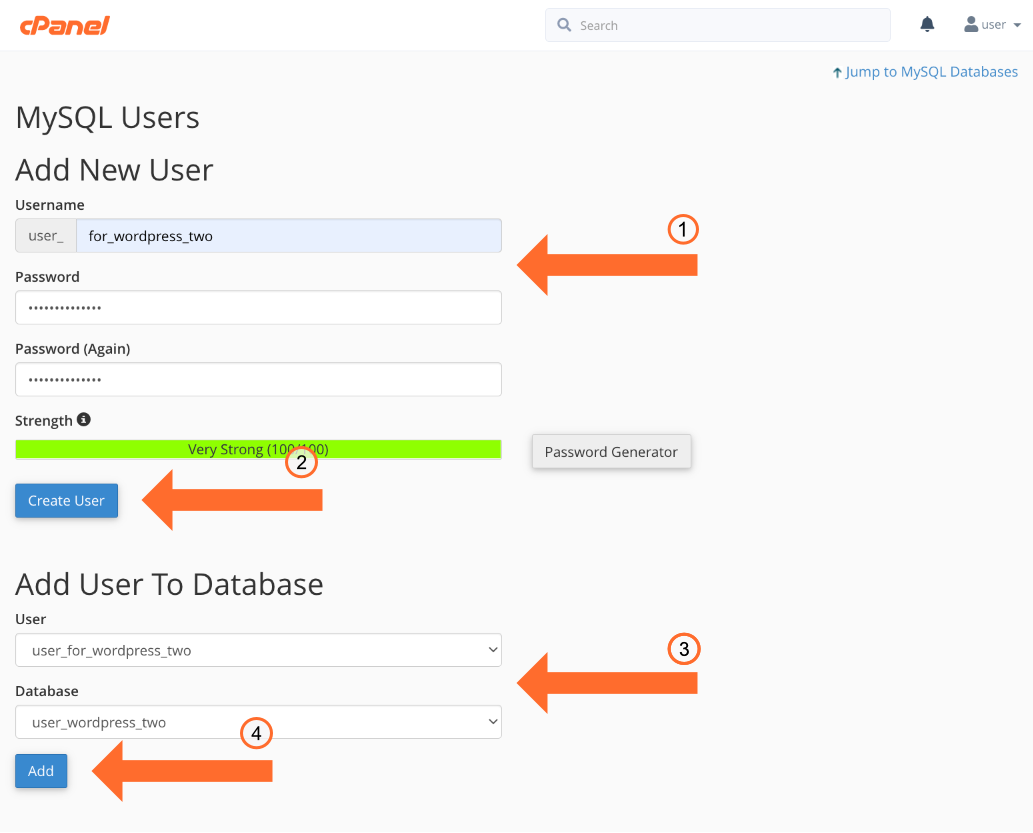
The last step in this section is to give the database a user with a password. You can use an existing database user, but we'll add a new user and give them a unique password.
In cPanel, navigate to the MySQL Databases page. Scroll to the Add New User section.
- Under Add New User, enter a username and a strong password.
- Click Create User, and then return to the MySQL Databases page.
- Under Add User to Database, select the new user and the database we created in a previous section.
- Click Add, select "All Privileges" on the next page, and confirm the changes.
We now have the files and the database copied, but our cloned WordPress site is still configured to use the original site's database. The next task is to configure the clone to use its own database.
Edit the Cloned Site's Database and URL Configuration
This step is WordPress-specific, but you will have to do something similar for other content management systems.
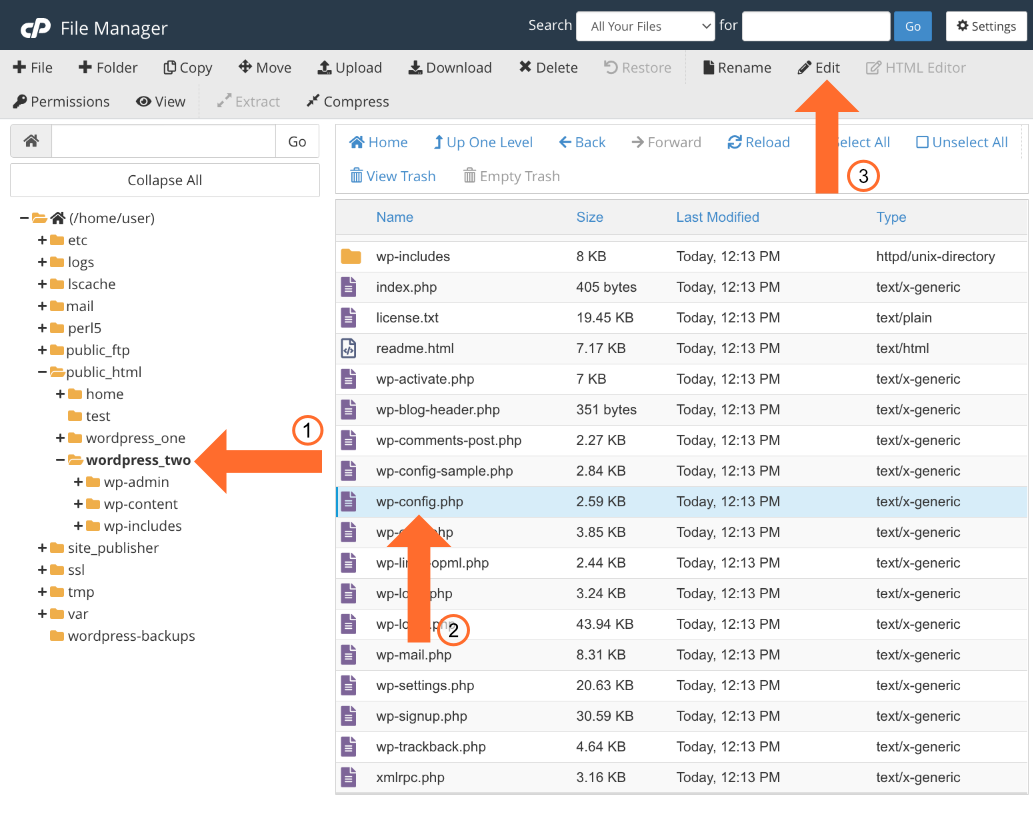
- Open File Manager and select the new site's directory.
- Select the wp-config.php file.
- Click Edit in the toolbar.
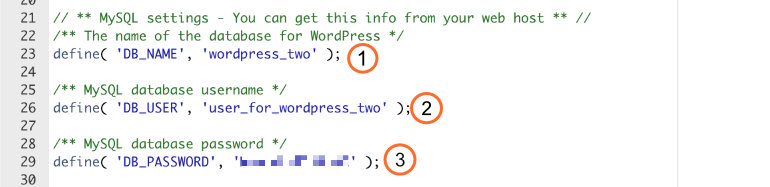
We need to edit several fields in the MySQL settings section of wp-config.php so that WordPress can access and authenticate with the new database.
- Enter the new database name in the DB_NAME field.
- Enter the user we just created in the DB_USER field.
- Enter the user's password in DB_PASSWORD.
While we have wp-config.php open, we can also tell WordPress about its new URL. There are various ways to do this, but the quickest is to add the following lines, with appropriate changes, to the bottom of the file.
define( 'WP_HOME', 'http://example.com/wordpress_two' );
define( 'WP_SITEURL', 'http://example.com/wordpress_two' );
Don't forget to click Save Changes when you're finished.
All being well, you should be able to load your cloned site at http://your_domain.com/your_subdirectory. If you've followed the examples, that will be something like http://example.com/wordpress_two.
Conclusion
You now know how to clone a website in cPanel.
