Security is important for our data safety, and we recommended you enable the Two-Factor Authentication(2FA) on your cPanel account so that hackers will be unable to access your cPanel account even if they have somehow obtained your accounts user and password details.
This article provides a guide for how to enable two-factor authentication on cPanel.
How to Enable the Two-Factor Authentication (2FA) on Your cPanel Account
Enabling Two-Factor Authentication (2FA) on your cPanel account enhances its security by requiring an additional layer of verification beyond your password. Here's a detailed guide to set up 2FA on cPanel:
Step 1: Log in to Your cPanel Account
- Login to cPanel.
- Enter your username and password, then click Log In.
Step 2: Locate the Two-Factor Authentication Tool
- Once logged in, navigate to the Security section on the cPanel home page.
- Click on the Two-Factor Authentication icon. This will take you to the 2FA management interface.
Step 3: Set Up 2FA
- On the Two-Factor Authentication page, click Set Up Two-Factor Authentication (or a similar option, depending on your cPanel version).
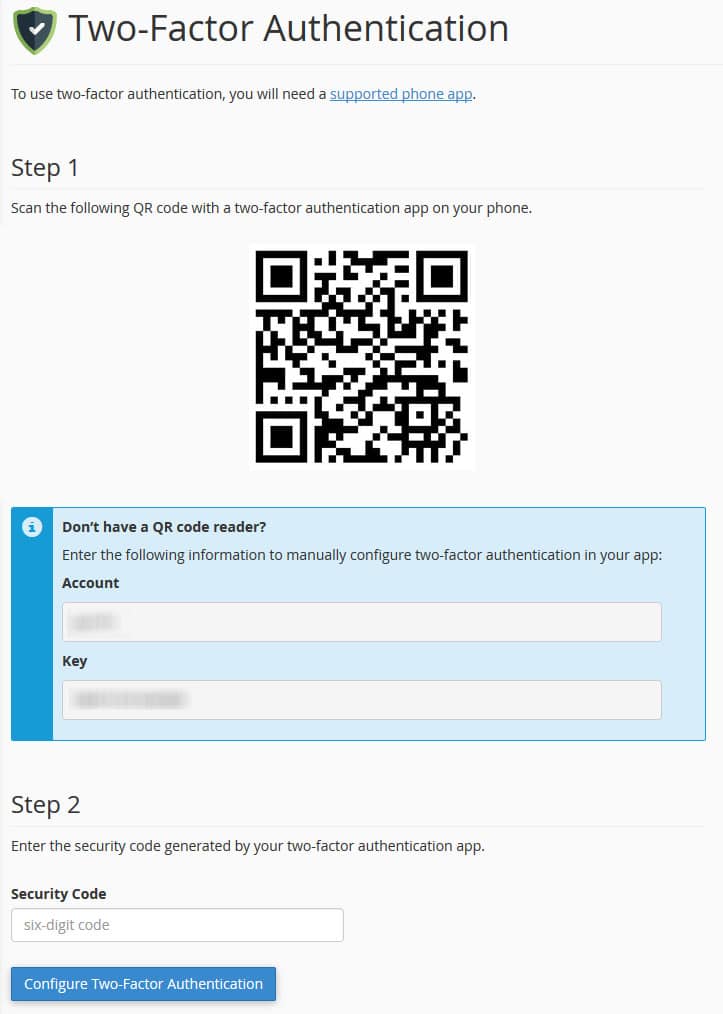
- You will see a QR code displayed on the screen.

Step 4: Install a 2FA App on Your Mobile Device
- Download and install a 2FA app like Google Authenticator (recommended), Authy, or Microsoft Authenticator on your smartphone or tablet.
- These apps are available for free on Google Play Store (Android) or Apple App Store (iOS).
Step 5: Link cPanel to Your 2FA App
- Open the 2FA app on your mobile device.
- Use the app to scan the QR code displayed on your cPanel screen.
- If your app does not support QR codes, you can manually enter the key provided below the QR code.
- The app will now generate a 6-digit verification code for your cPanel account.
Step 6: Verify the 2FA Setup
- Enter the 6-digit verification code from your 2FA app into the verification field on the cPanel Two-Factor Authentication page.
- Click Configure Two-Factor Authentication (or the equivalent option).
Step 7: Confirm Successful Setup
- If the setup is successful, cPanel will display a confirmation message.
- Log out of your cPanel account and try logging back in to ensure 2FA is working correctly.
Step 8: Keep Backup Codes (Optional but Recommended)
- Some 2FA apps provide backup codes that you can use if you lose access to your 2FA device. Make sure to store these codes in a safe place.
- Save these codes in a secure location. They can help you access your account if you lose access to your 2FA app.
Step 9: Test the Login Process
- Log out of cPanel and attempt to log back in.
- After entering your username and password, you will be prompted to enter the 6-digit code from your 2FA app.
- Enter the code and click Verify or Log In.
Conclusion
You’ve successfully enabled Two-Factor Authentication on your cPanel account, providing an added layer of protection against unauthorized access.
 👀 Choose SSD-powered VPS servers for increased speed, power, and security! Now 50% off- starting from only $1.99/mo.


