 👀 Choose SSD-powered VPS servers for increased speed, power, and security! Now 50% off- starting from only $3.19/mo.
Let us acknowledge, even though searching the world-wide-web, we often came across a website that does not load. Even nevertheless the web page appears to be to be working fone on other units, it fails to loads on PC. This mainly transpires owing to out-of-date DNS cache or DNS cache corruption.
The new running system from Microsoft, Windows 11, is not solely no cost from bugs and problems. A lot of Windows 11 people have claimed that they are acquiring difficulties accessing some websites or apps. So, if you are also operating Home windows 11 and facing complications when accessing internet websites or apps, you are looking through the appropriate short article.
Measures to Flush DNS Cache in Windows 11
In this post, we will share several solutions to flush DNS cache in Home Windows 11. Flushing Home Windows 11 DNS cache can fix most of the world wide web connectivity troubles.
So, let us check out how to flush the DNS cache in Home Windows 11.
1. Flush DNS Cache via CMD
In this strategy, we are likely to use the Windows 11 CMD to flush the DNS cache. Comply with some of the simple steps provided below.
Action 1. Initially of all, open the Start menu and type in ‘CMD.’ Correct-simply click on the CMD and find ‘Run as administrator’
Step 2. On the Command Prompt, you need to execute the following command and the Enter button.
ipconfig /flushdns

Stage 3. Once executed, you will be notified the process was successful.

That's it! This is how you can flush Windows 11’s DNS Cache by way of Command Prompt.
2. Flush Windows 11 DNS Cache employing PowerShell
Just like the Command Prompt, you can even benefit from the PowerShell to flush the DNS Cache. You need to have to put into action some of the basic techniques specified underneath.
1. First, open Windows search and type in ‘PowerShell.’ Then, right click on Home windows Powershell and find the ‘Run as Administrator’ option.

Phase 2. On the PowerShell Window, copy and paste the following command and hit the Enter button.
Crystal clear-DnsClientCache

That’s it! This is how you can flush the DNS cache of your Windows 11 computer system.
3. Flush DNS Cache utilizing Operate Command
In this strategy, we will use the Run dialog box to flush the DNS cache in Windows 11. Just comply with some of the straightforward methods supplied beneath to flush DNS Cache.
Phase 1. 1st of all, push Windows Vital + R on your keyboard. This will open the Operate dialog box.

Phase 2. On the Operate dialog box, enter ‘ipconfig /flushdns’ and hit the Enter button.
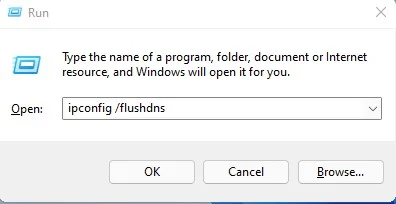
That is it! You are accomplished. The higher than command will flush the DNS cache on Windows 11.
4. Distinct DNS Cache in Chrome
Very well, couple of Home windows apps like Google Chrome keep their very own DNS Cache. The DNS Cache of Chrome is diverse from the DNS Cache saved on your OS. So, you would need to apparent the DNS Cache of the Chrome browser as well.
Phase 1. First of all, open up the Google Chrome world wide web browser.
Stage 2. On the URL Bar, enter chrome://internet-internals/#dns and strike the Enter button.

Stage 3. On the landing web page, simply click on the ‘Clear host cache’ button.

That’s it! You are done. This is how you can flush DNS Cache in Windows 11.
