 👀 Choose SSD-powered VPS servers for increased speed, power, and security! Now 50% off- starting from only $3.19/mo.
Flushing the DNS resolver cache can help resolve DNS related problems in Microsoft Windows 10. Issues would include web site not found errors or not being able to view certain web pages that have changed.
To reset the DNS resolver cache, perform the following steps:
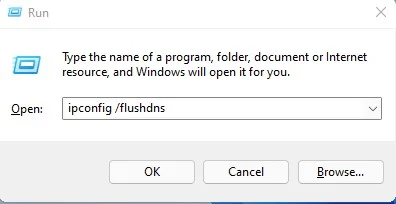
- Hold down the Windows key and press “R” to bring up the Run dialog box.

- Type “ipconfig /flushdns” then press “Enter“.


A command box will flash on the screen briefly and then the DNS Resolver cache is cleared.
SEE ALSO: Flush DNS Cache in Windows 11
